
In Part-1 of this blog series I described my path to finally purchasing a Dell XPS-13 laptop. This entry describes the adventure of customizing the laptop and installing Ubuntu 16.04 LTS.
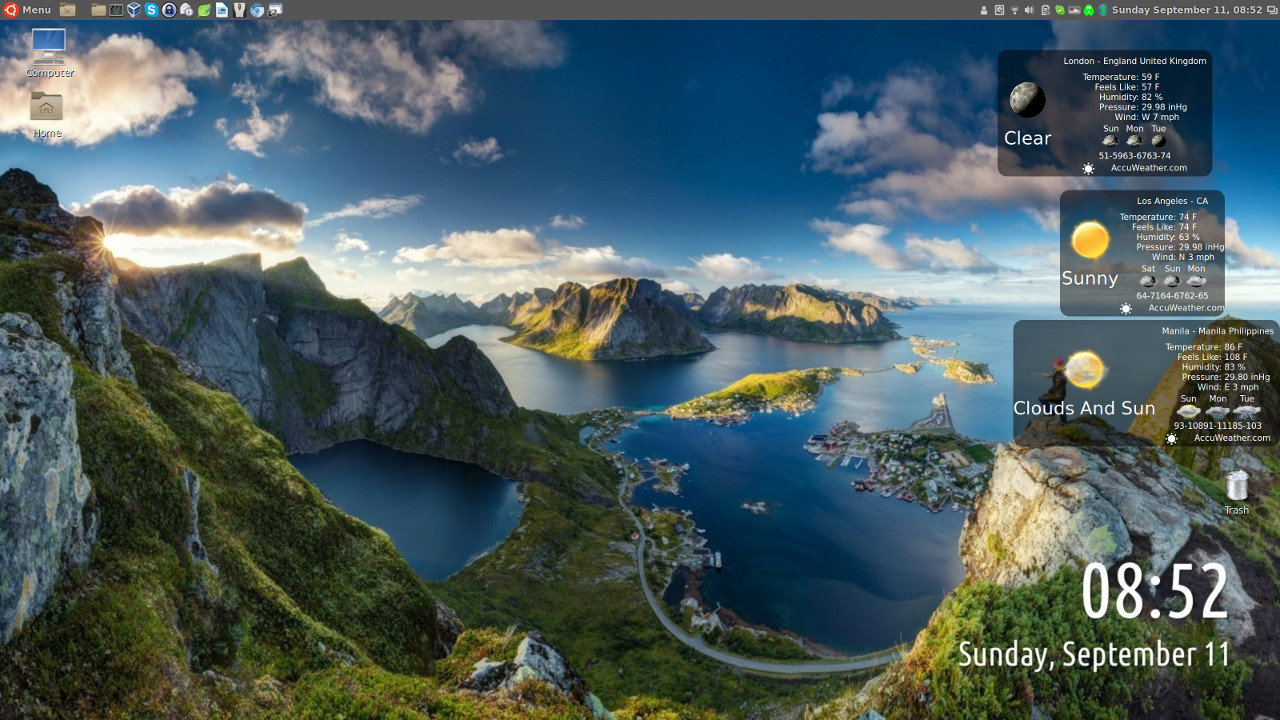
To get you in the mood for what is coming – check out my awesome XPS-13 desktop.
Step 1) Ran the factory setup and let Windows 10 take over. (For a short time).
This was the least fun of the process. But a necessary one. I went through the setup and patched Windows. In the short time Windows 10 was on the box, I became even more convinced I would never use it. The sliding graphics in the boxes on the desktop are beyond annoying.
Step 2) Updated the BIOS.
This is a critical step and should not be overlooked. The latest BIOS is 1.4.4 dated 30-Jun-2016. Many bloggers who have installed Linux on this laptop insist this much be done to be successful. It was easy to do when the laptop was running Windows 10. Just download the installer and run it. Be sure the laptop is plugged in when you do so. You do not want the battery going dead in the middle of a BIOS upgrade.
Step 3) Created backups so I could return the laptop to factory state if needed.
This is another task that took some time – but is really important. I want to be able to return the laptop to factory fresh in the future if required. To do this I needed three things:
1) An external USB disk. (Seagate is my preferred vendor).
2) Macrium SSD backup software or equivalent.
http://www.macrium.com/reflectfree.aspx
3) A bootable Linux distribution on a USB thumb drive.
The Macrium Reflect Free edition software is powerful and easy to use. I downloaded and installed it in the Window 10 environment and created a Windows PE rescue ISO plus a complete backup. Both outputs were stored on an external USB hard drive.
To be sure that I could recover the original laptop SSD image, I also used good old dd and made a compressed image of the SSD. To do so, I booted the laptop with a live Ubuntu thumb drive. I next mounted my external USB hard drive. Then I entered the below command from a terminal window:
$sudo dd if=/dev/nvme0n1 conv=sync,noerror bs=64K | gzip -c > /media/ubuntu/usbdisk/nvme0n1.img.gz
This took a while, but it is worth the effort.
Once all the backup work was completed, I documented what I did in a simple text file and saved it on the external hard disk where the backup images are. This ensures I will be able to recall what I did far in to the future. I also saved the Macrium Reflect installation binary there also.
Step 4) Wiped the SSD with zeros.
It is probably a little crazy, but Sopwith trusts nobody. So, before installing Ubuntu 16.04 on the XPS-13, I wiped the SSD. I did this while still in the bootable Ubuntu environment. This is easy to do with the below command:
$sudo dd if=/dev/zeros of=/dev/nvme0n1 conv=sync,noerror bs=64K
SSD’s are very fast, so this did not take a long time (less than 20 minutes.)
Step 5) Replaced wireless card.
In all of my research on the XPS and Ubuntu installs, it became apparent to me the Broadcom wireless card had to go. There are just too many issues with drivers, and the range of the device is not up to snuff. I ordered an Intel 2nd Generation Dual Band Wireless Adapter for Desktop Computer/Notebook (7265) from Amazon for $20 USD.
There is always something scary about breaking open a brand new laptop and replacing a component. I have done this many times before, but it is still always challenging. My biggest fear with the XPS was that I would break a tab on the bottom cover, or I would scratch the top or bottom. I took my time and made sure I had the right tools.
There are plenty of resources on the web that show how to open up the bottom of the unit. The torx screws are really tiny and there is also one tiny phillips head screw under the hinged door in the middle of the bottom plate. Once the screws came out, I used a plastic cell phone pry tool and gently lifted the bottom panel up all around the edges. Take you time when you do this. You do not want to break any of the tabs.

Once the cover was off, replacing the wireless card was a snap. Pop off the two wires and remove the single screw holding the metal bracket. Slide out the old unit and insert the Intel card. Install the wires and screw down the bracket. Done. Carefully snap the bottom plate back in place and re-install the screws.
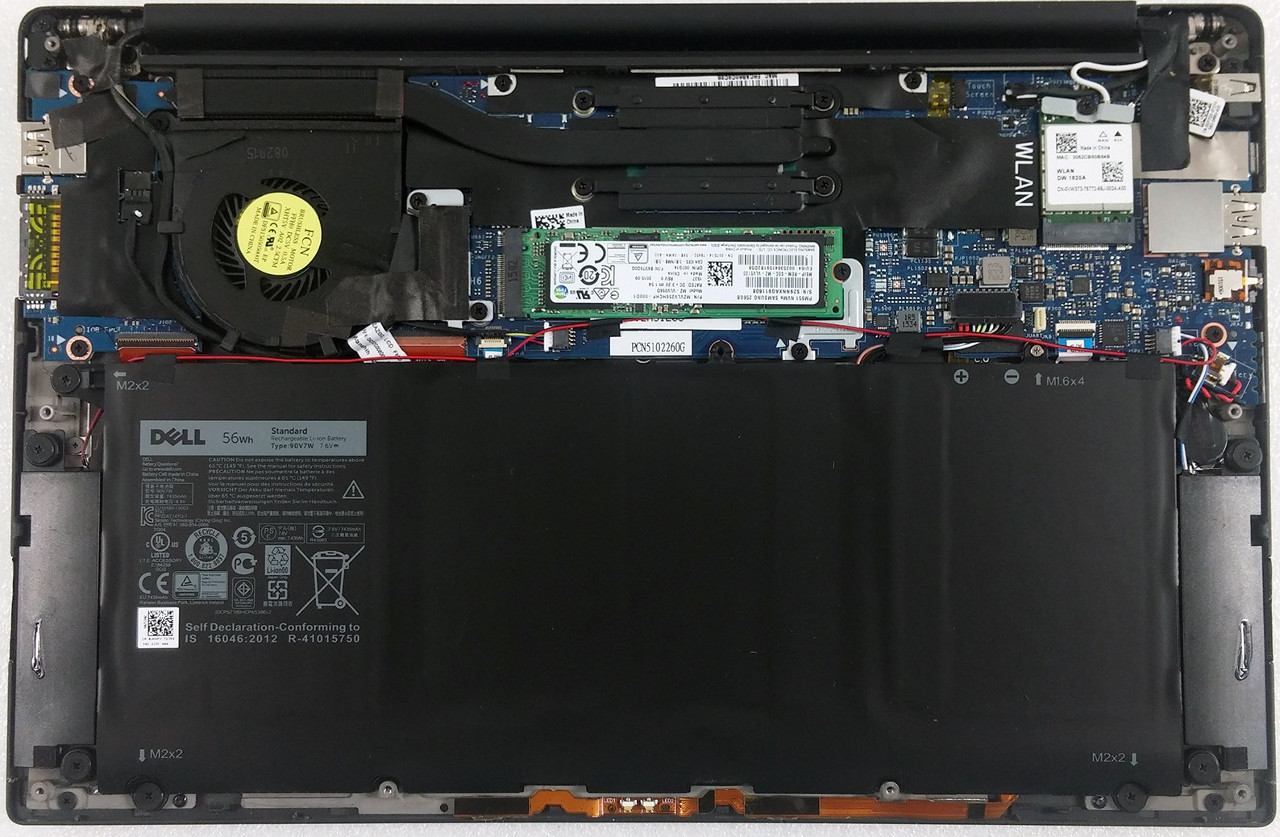
I immediately booted the laptop with the live Ubuntu thumber, and sure enough, my wireless networks were immediately identified. It works! I am very glad I went to the trouble to do this as you will see in a bit.
Step 6) Created a bootable Ubuntu 16.04 LTS thumb drive.
There is volumes of information on how to do this on the web. You simple download the ISO from one of Ubuntu’s mirror sites and “burn” it to a USB thumb drive. Remember, to burn the image and not copy it. I use unetbootin (https://unetbootin.github.io/), but there are plenty of other similar utilities to choose from on all platforms.
Step 7) Installed Ubuntu Ubuntu 16.04 LTS.
I booted the XPS with the live Ubuntu 16.04 LTS thumb drive. Once it booted, I connected to my wireless network. Next, I clicked on Install on the desktop and let ‘er rip. I accepted all of the default installation options except one. I clicked on the encrypt the root folder. I always encrypt my laptops. No exceptions here.
The install went off without a hitch – and blazingly fast with the SSD. I rebooted and everything just worked. The touch screen, trackpad, sleep mode, everything! I update the system from a terminal window with: 1) $sudo apt-get update and 2) $sudo apt-get upgrade.
I was quite amazed it all worked. Koodos to the Canonical team for a truly great Ubuntu release. I was planning on having to spend days on chasing drivers and getting it all to work. Not necessary.
Step 8) Replaced the Desktop Manager.
I am not a big fan of Unity. It had to go. I do prefer to stay with Ubuntu instead of installing Mint or some other derivative. So I installed the Cinnamon Desktop on top of Ubuntu. I followed these instructions:
http://www.webupd8.org/2016/04/how-to-install-cinnamon-30-in-ubuntu.html
Once installed, I rebooted and elected the Cinnamon Desktop at login. You do this by clicking on the gear logo and selecting it from the dropdown list.
Wow! What an incredible display. The graphics on this laptop are stunning.
Step 9) Installed Variety.
Variety is a really clever desktop background app created by Peter Levi. It scours the Internet’s photo sights and downloads random photos and shuffles your desktop background. I am hooked on this app. It is so cool to see a stunning photo transform you desktop every 15 minutes (timer is configurable). Some of the photos are weird, but you can move on to the next one with a mouse click. You can find more about Variety here: http://peterlevi.com/variety/
There are a few more tweaks I performed to get the laptop how I want it. I will blog on these changes in a future post.
Without a doubt – this is the best laptop setup available anywhere. The world will be better without Windows.
Sopwith